• About Blog

    What's Blog?

    A blog is a discussion or informational website published on the World Wide Web consisting of discrete, often informal diary-style text entries or posts.

  • About Cauvery Calling

    Cauvery Calling. Action Now!

    Cauvery Calling is a first of its kind campaign, setting the standard for how India’s rivers – the country’s lifelines – can be revitalized.

  • About Quinbay Publications

    Quinbay Publication

    We follow our passion for digital innovation. Our high performing team comprising of talented and committed engineers are building the future of business tech.

Monday, December 28, 2020

Understanding Rate Limiting Algorithms

Rate Limiter Image

Why do we need an API Rate Limiting ?

Rate Limiting helps to protect our services against abusive behaviours targeting an application layer like denial of service attacks, brute-force login attempts or transactions etc. These attacks are usually carried out through HTTP/HTTPS requests which may look like they are coming from real users, but are typically generated by bots or some kind of scripts. As a result, these attacks can easily bring down a service or application and often harder to detect it.

If we have a rate limiter in place, it will make sure malicious script can’t abuse a service or application. It will prevent service being overloaded with un-necessary traffic or requests and provide better experience for the consumer.

Algorithms for Rate Limiting

In general, a rate is a simple count of occurrences over time. However, there are several different techniques for measuring and limiting rates, each with their own uses and implications.

Token Bucket

In this algorithm, assume you’ve bucket full of tokens. When a request comes, a token has to be taken from the bucket so it can be processed further. If there is no token available in the bucket, the request will be rejected. The token bucket is also refilled based on per time unit.
Here we can limit the requests per user per time unit by assigning a bucket with fixed amount of tokens to each user. When a user uses up all tokens in a given time period, we know that he has exceeded the limit and discard his requests until his bucket is refilled.

Token Bucket Image

Leaky Bucket

This algorithm is closely related to Token Bucket, where it provides a simple approach to rate limiting via a queue which you can think of as a bucket holding the requests. When a request is registered, it is appended to the end of the queue. At a regular interval, the first item on the queue is processed. If the queue is full, then additional requests are discarded (or leaked).

The advantage of this algorithm is that it smooths out bursts of requests and processes them at an approximately average rate. It’s also easy to implement on a single server or load balancer, and is memory efficient for each user given the limited queue size.

Leaky Bucket Image

Fixed Window

In this algorithm, a window size of N seconds (such as 60 or 600 seconds) is used to track the rate. Each incoming request increments the counter for the window. If the counter exceeds a threshold, the request is discarded. The windows are typically defined by the floor of the current timestamp, so 10:00:06 with a 60 second window length, would be in the 10:00:00 window.

The advantage of this algorithm is that it ensures more recent requests gets processed without being starved by old requests. However, a single burst of traffic that occurs near the boundary of a window can result in twice the rate of requests being processed, because it will allow requests for both the current and next windows within a short time. Additionally, if many consumers wait for a reset window at the peak hour, then they may rush to your API at the same time.

Fixed Window Image

Sliding Log

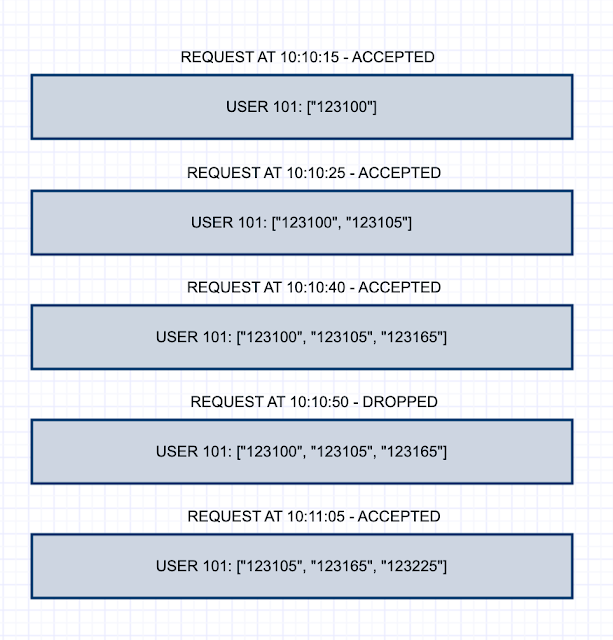
Sliding Log rate limiting involves tracking a time stamped log for each consumer request. These logs are usually stored in a hash set or table that is sorted by time. Logs with timestamps beyond a threshold are discarded. When a new request comes in, we calculate the sum of logs to determine the request rate. If the request would exceed the threshold rate, then it is held.

The advantage of this algorithm is that it does not suffer from the boundary conditions of fixed windows. The rate limit will be enforced precisely and because the sliding log is tracked for each consumer, you don’t have the rush effect that challenges fixed windows. However, it can be very expensive to store an unlimited number of logs for every request. It’s also expensive to compute because each request requires calculating a summation over the consumers prior requests, potentially across a cluster of servers. As a result, it does not scale well to handle large bursts of traffic or denial of service attacks.

Sliding Log Image

Sliding Window

A hybrid approach that combines the low processing cost of the fixed window algorithm, and the improved boundary conditions of the sliding log algorithm. Like the fixed window algorithm, we track a counter for each fixed window. Next, we account for a weighted value of the previous window’s request rate based on the current timestamp to smooth out bursts of traffic.

For example, if the current window is 25% through, then we weight the previous window’s count by 75%. The relatively small number of data points needed to track per key allows us to scale and distribute across large clusters.

Sliding Window Image

API Rate Limiter can be deployed as a separate service that interacts with web server. Rate Limiter will suggest web server that request should be passed to API server or not. If request Limit is exceeding the threshold, request will be responded with http status code 429 by the server.

API Rate Limiter Design Image

You can read the implementation of some of these algorithms at:

Wednesday, December 23, 2020

Incoming Webhook in Microsoft Teams

Microsoft Teams

Microsoft Teams has been around for the last four years. Teams evolved from Skype for Business and Microsoft developed it to compete with other popular communications tools like Hangout/Slack/Zoom etc.

As all of you know we use the Microsoft Teams to talk to team or individual team members on a day to day basis. Just imagine if we can get critical information like monitoring alerts of application(s) or database(s) or any other events that is important to you or your team can be notified at real time. I think everyone will welcome an idea like this without a doubt.

As the year 2020 has been a difficult year because of COVID-19 and team members are working remotely, so I picked up this topic and did some deep dive into it, so things which are critical can be made available at one place so if we have any issue(s) it can be notified to all team members, so it becomes easy to act on it. Here I am going to walk you through the basic setup within Microsoft Teams which allows anyone to setup a webhook. Using the webhook we can send custom notifications based on requirements.

Incoming webhook are special type of Connector in Microsoft Teams that provide a simple way for an external application to share content in team channels. Microsoft Teams provides a unique URL to which you send a JSON payload with the message that you want to POST, typically in a card format. Cards are user-interface (UI) containers that contain content and actions related to a single topic and are a way to present message data in a consistent way.

Add an incoming webhook to a Microsoft Teams Channel

  • Navigate to the channel where you want to add the webhook and select (•••) More Options from the shortcut navigation bar.
  • Choose Connectors from the drop-down menu and search for Incoming Webhook.
  • Select the Configure button, provide a name, and, optionally, upload an image avatar for your webhook.
  • The dialog window will present a unique URL that will map to the channel. Make sure that you copy and save the URL — you will need to provide it to the outside service.
  • Select the Done button. The webhook will be available in the team channel.

To send a message through an incoming webhook, you post a JSON payload to the webhook URL. You can also use this JSON to create cards containing rich inputs, such as text entry, multi-select, or picking a date and time. The code that generates the card and posts to the webhook URL can be running on any hosted service. These cards are defined as part of actionable messages, and are also supported in cards used in Teams bots and Messaging extensions.

Post a message to the webhook using cURL or Postman

From the command line, enter the following cURL command:

curl -H ‘Content-Type: application/json’ -d ‘{“text”: “Welcome to the world of Microsoft Teams Notification !”}’ ‘<YOUR WEBHOOK URL>’

If the POST succeeds, you should see a simple 1 output or response by curl. Check the Microsoft Teams, you should see the above message posted in your Channel.

A JSON payload to format the message with a better presentation instead of plain text message.

{
   "@type": "MessageCard",
   "@context": "http: //schema.org/extensions",
   "themeColor": "0584 ED",
   "summary": "Incoming Webhook Notification Demo",
   "sections": [{
"activityTitle": " ** Birthday of John Doe ** ",
"activitySubtitle": "May this special day be as incredible as you are.May this birthday be the start of a joyous and astonishing life ahead.Happy Birthday!",
"activityImage": "https: //pngimg.com/uploads/happy_birthday/happy_birthday_PNG7.png",
"markdown": true
}]
}

Once you’ve this basic thing setup, it opens up lot of possibility or opportunity to use it for various things like notifying your team on bugs created, pull requests or any integration with other systems to get the required information at real-time can be achieve.

Rate limiting for Connectors

Application rate limits control the traffic that a connector or an incoming webhook is allowed to generate on a channel. Teams tracks requests via a fixed-rate window and incremental counter measured in seconds. If too many requests are made, the client connection will be throttled until the window refreshes, i.e., for the duration of the fixed rate.

The limits are in place to reduce spamming a channel with a connector and ensures an optimal experience to your requirements. Please use it wisely.

Remove an incoming webhook from a Microsoft Teams Channel

  • Navigate to the channel where the webhook was added and select (•••) More Options from the shortcut navigation bar.
  • Choose Connectors from the drop-down menu.
  • On the left, under Manage, choose Configured.
  • Select the number Configured to see a list of your current connectors.
  • Select Manage next to the connector that you want to delete.
  • Select the Remove button and you will be presented with a Remove Configuration dialog box.
  • Optionally, complete the dialog box fields and checkboxes prior to selecting the Remove button. The webhook will be deleted from the team channel.

Featured Post

Benefits & Best Practices of Code Review

Photo by Bochelly Code reviews are methodical assessments of code designed to identify bugs, increase code quality, and help developers lear...